Another pair of Bones painted up a few weeks ago, this time it’s Sandra Garrity’s Pillar of Good and Pillar of Evil from Reaper’s Bones line, from their second Bones Kickstarter.
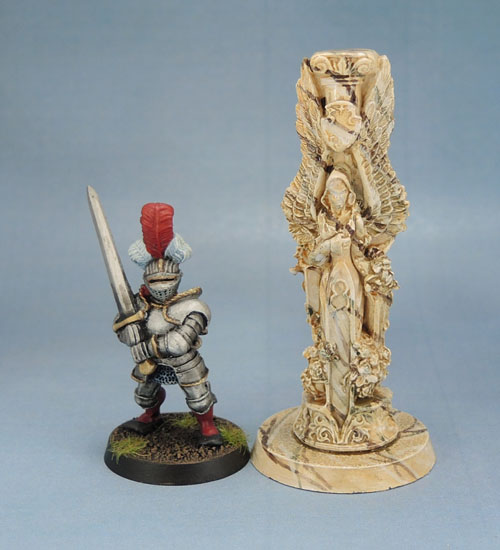
Reaper Bones 77246: Pillar of Good with Citadel Reiksgard for scale.
I’ve posed the pillar of good alongside a Reiksgard, as the model has a feel of nobility and goodness. I don’t have any painted SigMarines at this point, so it fell to the knight in shining armour to provide the reference model. No Sir ForScale here!
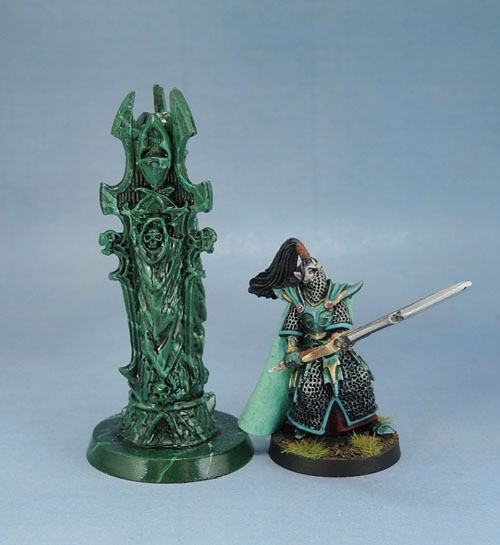
Reaper Bones 77247: Pillar of Evil with Citadel Dark Elf for scale.
The pillar of evil has a Dark Elf for it’s scale shot. Seems this marble pillar is a bit crooked.

Reaper Bones Pillars of Good and Evil, side by side.
The pair of these were my first, very rough attempt at painting marble. I’d already started in on both of them before I decided to go with a marble effect rather than simply stone, so perhaps the colours aren’t what they could be. I also based both of them on 32mm citadel bases with a metal washer superglued underneath to give them more stability. As you can see here the Evil pillar isn’t entirely straight because Reaper Bones! They’re not bad pieces, especially for the KS price. Both styles would work better in pairs, but I only have the one of each and I think sourcing a second one of each and then trying to match-paint them is too much mucking about. They’re also probably both more suited to “inside dungeon” type settings than outdoor battlefields.
I used the new “Gloss” versions of Nuln Oil and Axgrax Earthshade on both to see how they perform – the Gloss part not being especially relevant as I varnish my models, but the way that the pigment behaves. I think they did both work well. There was a wash of off-white paint used on the “Good” pillar in an attempt to embed the veins “under” the surface a little. I considered dulling down the bases with some pigments, but I figured that keeping them shiny keeps them a little more flexible in setting.
Anyway, these were pretty quick and easy to do, and it’s another two models done.

You nailed the marble effect Azazel. I particularly like the paler marble.
LikeLiked by 1 person
Thanks Cheetor. I clearly need more practice on both types down the line though.
LikeLiked by 1 person
Very nice marble dude! I can see these coming in handy for a range of gaming needs 🙂
LikeLiked by 1 person
Thanks Alex. They’ll make nice little bits of deco – and maybe “bases” for some kind of CTF game.
LikeLiked by 1 person
Very impressed – great effect on both pillars!
LikeLiked by 1 person
Thanks! They look a little better in person due to the shine.
LikeLike
The white marble looks very good, so does the green variety. I find the green looks also a bit like greenstone, especially given the light gloss it has on the picture.
I think in this case the fact that the pillars are not entirely straight is not such a big deal. Overtime the fundament may have gotten loose and the whole pillar moved a bit downwards to one side. It does however bother me on the tables and chairs they had in the kickstarter and on the candle holders I Have. I feel I need to drive a steel rod through them, so that they are nice an straight.
Given they now use a slightly firmer mix this may not be such a problem in the future.
LikeLiked by 1 person
That’s a good point, and I have a couple of greenstone pieces around the place from my visits to Aotearoa a decade ago, so it might have been an unconscious influence.
You make a good rational point about the wonky pillars, though they still do bother me a little when I bother to think about them. Oddly enough, I’m much less bothered by the candelabrum and bendy spears and swords on many of the models I’ve painted – for some reason I find it easy to write the smaller pieces and less significant models off as not important enough to worry about.
LikeLike
Pingback: Ow! My Eyeball! ME-61 Throne of Sauron (without Sauron!) | Azazel's Bitz Box.
I’ve gotta ask. How did u get these affects? Love the pale Marble. Am wanting to paint my Stormcast Eternals from Warhammers Age of Sigmar Range in a green marble (Jade Stone) armour with cream marble trim. Basically these two schemes. Any tips oor a small tutorial of some kind 🙂
Any help is appreciated
Thanks….. Craig
LikeLiked by 1 person
Hi Craig, I don’t have any plans to do any more marble stuff in the near future (as I work through all the junk cluttering my paint desk) so a photo-tutorial is probably some time away, but I can talk you through them a little and hopefully that will help.
The pale marble was done by priming white, then painting the whole thing with a pale bone colour such as Old-GW “Bleached Bone” or the equivalent. (Ushabti Bone, Vallejo Game Color Bonewhite, etc).
The next wash was with a slightly darker colour – in this case a really-thinned “Snakebite Leather” or equivalent. I probably used XV-88. Vallejo GC 040 Leather Brown would also work.
I then drybrushed with paler-bone (Vallejo are 72.101 Off White and 72.098 Elfic Flesh).
Then the streaks were done with Vallejo Model Air Tank Brown (scorched brown/charred brown, etc would also work – basically a really dark brown).
Next it was all washed with a really-thinned off-white (use artist’s acrylic medium or Lahmian/Vallejo/Army Painter medium for this, not water) to embed the dark streaks under the white and “into” the paint.
Finally, another set of streaks, then a careful, thinned wash of Agrax Earthshade Gloss.
Allow to dry & varnish!
LikeLiked by 1 person
The Dark Green Marble was done by first priming Black, then a heavy drybrush with a very dark green. I used a Dark Angels green-type thing.
Then a drybrush of a lighter, richer green. Warpstone Glow would work.
Next a final drybrush of a really pale green. Something like the old Citadel Rotting Flesh. I think I used Vallejo Duck Egg Green.
Following that were the veins. I did one set with the same highlight colour (Duck Egg Green) and a second set with a slightly lighter colour. I think I mixed some Vallejo Off-White into the DE Green.
Then a thinned-down Nuln Oil Gloss to finish.
Note – it’s important to use the Gloss versions of those Citadel washes to complete the effect – the gloss washes act differently to the non-gloss ones – they have gloss medium int hem and so they flow differently – into the crevasses rather than strongly than staining the whole surface as the normal ones do.
Hope these wrote-ups aren’t too late for your project and you find them useful. Please post pics if you do use them!
LikeLike