
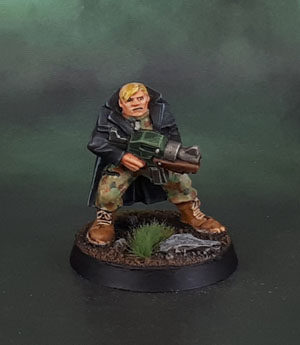
Another WarZone 1st Edition model today – one of the four from the WarZone Cartel Special Agents pack. He is, of course a Neglected Model and has been touched up and had some aspects repainted to fit in with current-quality models. I’d have posted this a few days ago, but I’m still burnt out, so much so that I actually forgot that I hadn’t posted this model (and the one that’s the subject of tomorrow’s post, also.)
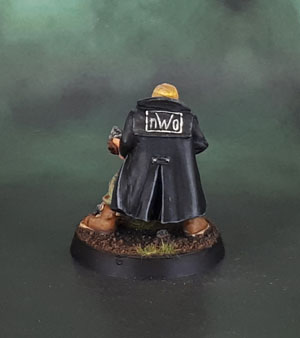
Once again, the model features nWo logo, the rationale behind this was that my force back in the day was nWo-branded Cybertronic, so it only made sense for the Cartel allies that I’d theoretically use to also feature the same iconography, for easy IFF on the tabletop. Updates to this model as part of Neglected September included patching up the chips that went to the bare metal, completely rebasing it, cleaning up and re-highlighting some parts of the jacket, and updating his hair from yellow-as-blonde, to a more realistic sandy colour (though it still looks a bit more yellowish in these pics than in hand).

Great camo pattern on the trousers, the lettering on the back is very crisp. Blonde hair can be tricky, bleach blonde is easier, but the hair you’ve done looks good
LikeLiked by 3 people
Yeah, I have gotten a lot better at painting blonde hair over the last few years than I was back in the day. It doesn’t look yellow in hand, and the highlights are in a sandy blond shade, not the yellow that you see here.
LikeLiked by 2 people
Have to agree with everything Dave’s said! Very nice indeed!
LikeLiked by 3 people
Thank you, JNV!
LikeLiked by 1 person
Very nice free hand once again.
LikeLiked by 2 people
Much appreciated, TIM!
LikeLiked by 1 person
Nicely done mate, especially the camo!
LikeLiked by 1 person
Thank you Alex. I ended up painting a lot of Auscam back in those days so I really got used to knocking it out while still making it look pretty decent. Glad to see that it still holds up today.
LikeLiked by 2 people
The sculpt makes him look sort of squashed, like his head’s been pushed down so his ears are level with his shoulders. Your paint on it looks good, tho. Excellent camo, and your lettering never fails to amaze me.
LikeLiked by 1 person
Something that came to mind while I was touching him up the other day was that between the facial sculpt, and the hair colour, and the overall pose, and the trench coat it kind of makes him look like a cartoon Nazi.
LikeLiked by 1 person
Yeah, I could totally see him squaring off against Cap and Bucky in a flashback issue or something!
LikeLiked by 2 people
Yeah, just paint him in greys and you’re golden!
LikeLike
Nice job on that figure- I echo the comments on the camo and hair. I find painting blonde difficult- could you share your technique please?
Cheers,
Pete.
LikeLiked by 2 people
These days?
First up I really strongly recommend picking up the Blonde Triad of paints from Reaper Miniatures (Blonde Hair, Blonde Highlight, Blonde Shadow), plus Golden Blonde
http://www.reapermini.com/OnlineStore/blonde
plus something like Vallejo Model Colour Pale Sand (837) and Citadel’s XV-88.
At that point lay down a base coat with whatever mid-tones you want to use, then drybrush or carefully paint a couple of players of highlights (especially on edges), water down the XV-88 and use it as a paint wash, then re-highlight to taste.
It’s kinda difficult to write more than that, but I might try to take some photos and do a simple tutorial on it next time I’m painting some blondes or blonds. Plenty more Vikings to come!
LikeLiked by 3 people
Thanks for that. I’ve got some minis to try it on fairly soon.
Cheers,
Pete.
LikeLiked by 1 person
Now all I need to do it remember to do it!
LikeLiked by 1 person
I love VMC Pale Sand. Nice quality paint, and great for many things. I haven’t tried the Reaper triad.
Generally I just experiment with hair, and haven’t been good about recording my results. It’s often really hit or miss for me. Which is why I should be even better about writing stuff down.
LikeLiked by 1 person
Aww man, I think I might have mistaken VMC Pale Sand for another color. I went to finish up painting some hair tonight…grabbed the pale sand, and nope, it was more white than yellow. Ended up repainting the whole thing Ushabti Bone, as I couldn’t figure out what color I used before. Note to self, take better notes.
LikeLiked by 1 person
Pale sand is also a great colour for the top highlights of Caucasian flesh. It’s very… sandy, though – so often you do want some of those yellows in your blonde. Or Blond.
LikeLiked by 1 person
I’ve been getting pretty good results from using Screaming Skull, and then washing with thinned down Army Painter Soft Tone. I don’t highlight after that, because it looks wrong with the Screaming Skull showing at full strength.
LikeLiked by 3 people
Thanks- something else for me to experiment with too.
Cheers,
Pete.
LikeLiked by 1 person
You could try the smallest amount of XV-88 mixed in with the screaming skull for the base, then a drybrush of screaming skull for the highlights before the Soft Tone Wash. I reckon that would work nicely to add a bit more depth without that “wrong” look.
LikeLiked by 2 people
If I ever have some XV-88 in my collection, I’ll have to give that a try.
LikeLiked by 1 person
AKA Snakebite Leather in old-school terms, Cobra Leather from Vallejo Game Colour, or close-ish to VMC Brown Sand (you might have some of one of those). One of my staple colours that gets used in almost everything in some form.
LikeLike
I’ve been looking for a replacement for Snakebite Leather for a couple of years now, since I ran out my last pot. XV-88 never came up as a suggestion before. I’ll have to give it a try. Gorthor Brown was the closest I’ve found, and that’s not very close. Thanks!
LikeLiked by 2 people
The Vallejo Game Colour “Cobra Leather” is their take on the same colour from when they were matching the GW paints, and is pretty good – but Citadel’s XV-88 is pretty much the same thing, albeit with a stupid name. Despite that, I love the stuff!
LikeLiked by 2 people
He’s cool mate. I like the jacket and camo pants
LikeLiked by 1 person
Thanks, Uce! 🙂
LikeLiked by 1 person
All the previous said what would have about this, so well done on this sculpt. I would add that you did a really nice job lining the black leather jacket. What shade did you use? Gray?
LikeLiked by 1 person
Thanks Mark, and yep – would have been Army Painter’s Uniform and Ash Greys.
LikeLiked by 1 person
Sorry to hear about the burnout. Guess that happens, the last couple of months have been tough here as well. I’m working on some stuff, but I’m not sure that completing anything is going to happen really soon. On the plus side, there are 23 more days left in this month, and a lot could happen between now and then!
Whew, your mini! Great job on getting him updated. I like the coat and the camo pattern. Camo is something I have to quit putting off at some point. Any particular insights on dealing with the paint chips? I’m guessing a brush on primer, and then trying your darnedest to match the existing color?
LikeLiked by 2 people
Yeah, as you saw I didn’t get much done or posted last month. I’m getting a bunch done now. Not that I feel much better, but I’m forcing the issue, basically. With the paint chips, it was basically as you described (and some brush-on varnish at the end!)
LikeLiked by 2 people