Battlefront 15mm M3 Honey Stuart Armoured Squadron – British 8th Army 4th New Zealand Armoured Brigade for Flames of War

Battlefront 15mm M3 Honey Stuart Armoured Squadron - British 8th Army 4th New Zealand Armoured Brigade for Flames of War, 1:100, 1/100, Battlegroup, What a Tanker

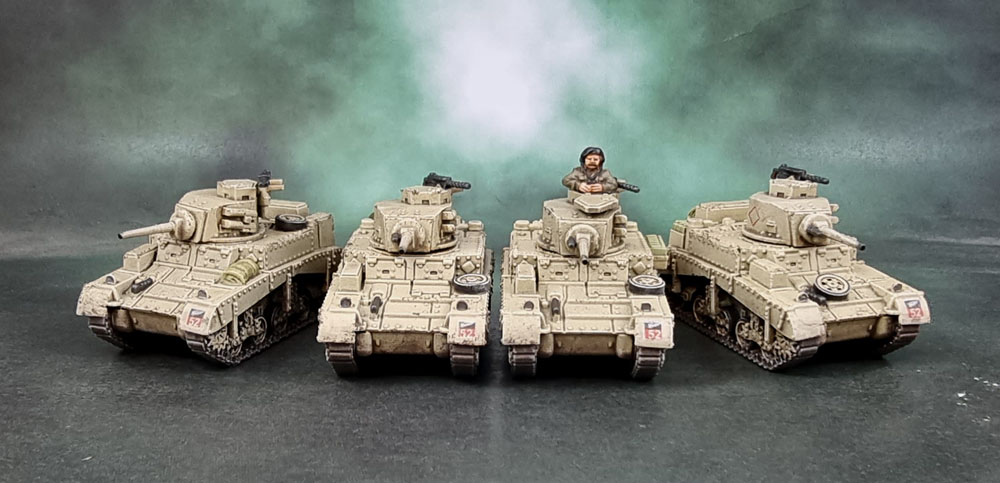
The next of my Commonwealth 8th Army units, we have my Brethren from across the ditch – some models representing the 4th New Zealand Armoured Brigade in Africa.

Battlefront 15mm M3 Honey Stuart Armoured Squadron - British 8th Army 4th New Zealand Armoured Brigade for Flames of War, 1:100, 1/100, Battlegroup, What a Tanker

The Kiwis also notably ran quite a few Shermans in WWII, though I’d already painted a half-dozen Shermans as my first models for the 8th Army. Also from my research, it seems that the NZ forces didn’t begin using their mud grey/blue-black camouflage until they hit Italy, before that time period their tanks were simply painted in the pale desert buff shade – so essentially what I’d been using as my base for the British Commonwealth forces to this point. Since using Honeys and leaving them bare of camouflage appeared to be the only way I could include the Kiwis with a reasonable accuracy for the late ’41-mid-’43 time period my force is set in.

Battlefront 15mm M3 Honey Stuart Armoured Squadron - British 8th Army 4th New Zealand Armoured Brigade for Flames of War, 1:100, 1/100, Battlegroup, What a Tanker

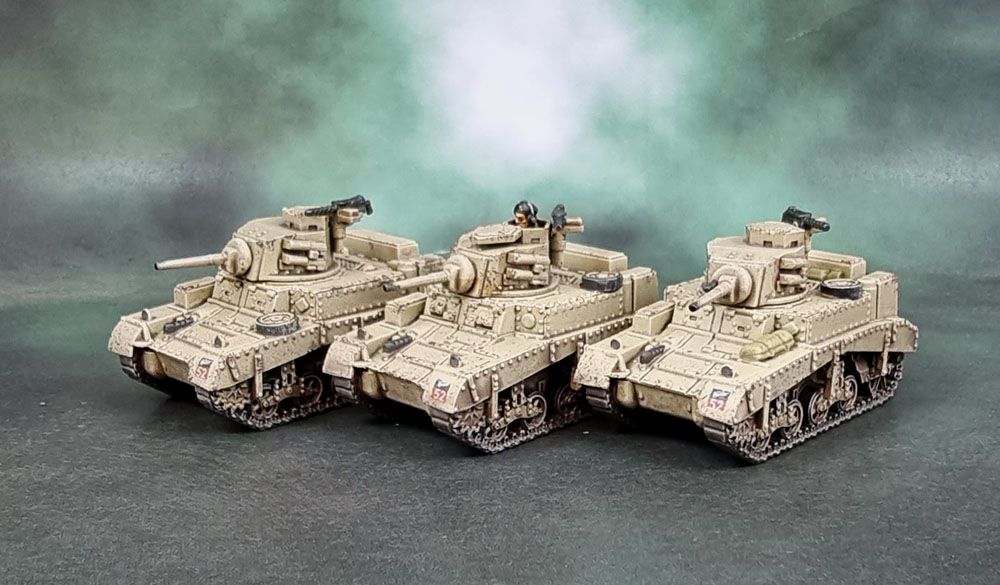
Being rather light tanks for this period of the war, they’ve been given diamond decals (well, squares applied on an angle) to represent the Recce vehicles being part of the Regimental HQ. NZ decals aren’t exactly easy to come by, if they do happen to actually exist, so I spent a few hours in Photoshop one afternoon putting some Silver Fern regiment decals together so I could run them through my printer.

Battlefront 15mm M3 Honey Stuart Armoured Squadron - British 8th Army 4th New Zealand Armoured Brigade for Flames of War, 1:100, 1/100, Battlegroup, What a Tanker

These tanks also represented a bit of a first for me – the first time I’ve used milliput to add stowage to models. Bedrolls and tarps and duffel bags. Basically with these tanks being smaller than any of the other British tanks I’d done to this point, the official clip-and-glue stowage (aside from jerry cans) seemed a bit large and awkward. I did nick a couple of small crates from another kit, but if I wanted to add any more differentiation to what is otherwise a pretty samey group of tanks, it would have to be via milliput! I also used a mixture of the two upper hulls provided in the kits – I couldn’t really find a specific difference in my limited research on the additional stowage, though I did make sure to use the turret variant associated with British use – though most sources I found online don’t really distinguish between the M3 “Honey” in British/Commonwealth service and the M3 Stewart in U.S service.

Battlefront 15mm M3 Honey Stuart Armoured Squadron - British 8th Army 4th New Zealand Armoured Brigade for Flames of War, 1:100, 1/100, Battlegroup, What a Tanker

Finally, I realised last night that two of the three commander models for these tank troops have moustaches! Possibly a bit of a stretch, but I’m thinking this might qualify those two tanks models at least as something for Roger’s “Mo’vember” painting challenge!

15mm Terrain Unboxing Review: Flames of War Battlefield in a Box – Desert Walls (Gale Force Nine BB225)

15mm Terrain Unboxing Review: Flames of War Battlefield in a Box - Desert Walls (Gale Force Nine BB225) 1/100, 1:100 Wargaming Terrain

Today I have the next of these Terrain unboxings of the Battlefield in a Box stuff I picked up recently. I think these will follow very much the same format as one another, since the point is really to give people a good solid look at what you get in the boxes as there’s not a lot out there aside from the glamour shots on the box and GF9 website when you’re looking around to see what you get and how it all looks.

15mm Terrain Unboxing Review: Flames of War Battlefield in a Box - Desert Walls (Gale Force Nine BB225) 1/100, 1:100 Wargaming Terrain

Opening the box you get a cardboard sleeve….

15mm Terrain Unboxing Review: Flames of War Battlefield in a Box - Desert Walls (Gale Force Nine BB225) 1/100, 1:100 Wargaming Terrain

That contains a lot of little bubble wrapped parcels behind the packing tape…

15mm Terrain Unboxing Review: Flames of War Battlefield in a Box - Desert Walls (Gale Force Nine BB225) 1/100, 1:100 Wargaming Terrain

OK. Here we are. Not all that impressive at this point, I have to say.

15mm Terrain Unboxing Review: Flames of War Battlefield in a Box - Desert Walls (Gale Force Nine BB225) 1/100, 1:100 Wargaming Terrain

Once laid out, they do cover a reasonable amount of space. Apologies for the bottom of the closest walls being cut off in the photo. They’re not perfect, and dareIsay, you or I could likely make something just as good or better pretty easily out of foamcore and/or thick card/mouinting board/etc -but, as I mentioned in the previous review, you’re paying a premium for something that’s ready to go – right out of the box. The smaller walls work perfectly as cover for infantry and artillery, while the larger walls work as blockers for line of sight. I’m actually just thinking now that the larger walls would also work for 28/32mm scale, so I might take a pic of a 28mm model alongside and slip it in later on.

15mm Terrain Unboxing Review: Flames of War Battlefield in a Box - Desert Walls (Gale Force Nine BB225) 1/100, 1:100 Wargaming Terrain

The little well, surrounded by bricks is pretty nice, and would take a bit more effort to replicate, as would the gate. The whole set contracts to take up quite a small amount of space for storage as well, which honestly is a good thing. These are made of the same resin as the other sets I’ve looked at, and while I’m sure they’d be likely to break or shatter if dropped on a hard floor, they’re hardy enough for a games table, and the one that fell onto the (thinly) carpeted floor did just bounce with no issues.

The pieces are all textured in a simple coat of rough, textured paint that has been given a simple drybrush. There’s a small amount of variation in the finish between the pieces, which makes sense as they’re clearly the products of a prodution line – though it’s not something that bothered me. There’s also a small amount of warping, and you can see there’s a bit of wonk in them not all lining up properly, both in terms of not being perfectly on a 90 degree angle, or even just the edges of the walls being the exact same height. If these were sold as a plastic or MDF kit, I’d be upset, but as they’re a “Ready to go” product, I ironically have slightly lower standards, despite the price. Simply put, the hobby time I’m not spending to make perfect walls is time I’m spending working on more models. I do enjoy working on scenery, but to be blunt, I enjoy working on scenery that’s a bit more exciting than these pieces.

With a small amount of effort, these could be made to look a lot better as well, but the nice thing is doing so isn’t needed to get them onto the table for a decent looking game. Once again, I’m quite happy with these. I am actually considering picking up a second set so I have the versatility to cover a much larger amount of table space while remaining reasonably consistent.