Shadows of Brimstone: Targa Plateau Dark Stone Pylons

Shadows of Brimstone Targa Plateau Dark Stone Pylons

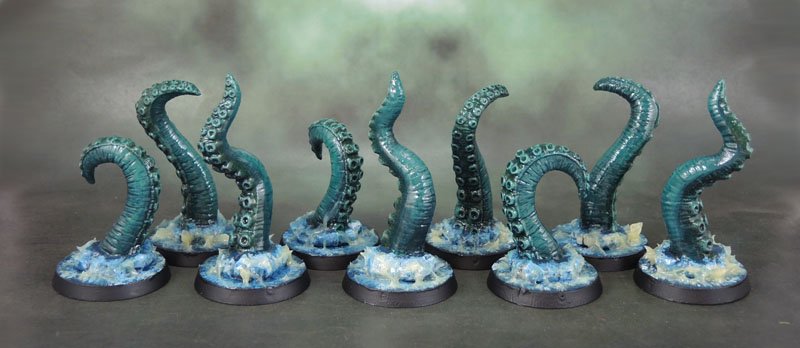
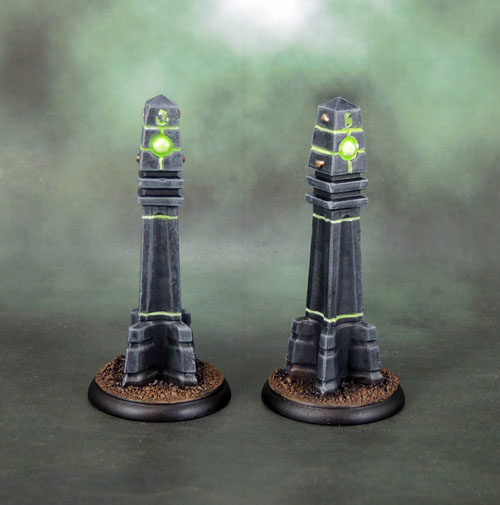
Over the course of last month, I became more and more acutely aware that I hadn’t actually finished painting many models at all over April. Last weekend, while going to sleep, and inspired by the tentacles that I’d just finished the actual painting on, I had an idea. Find some low-detail, mediocre-quality models that I could smash out with very little effort. Like the Gangsters and Nazis I did in January, or the Tentacles. The only question was: What to choose? Saturday night, after watching the replay of Longest Royal Rumble, I had a look. I’ve got a plethora of boardgame models that would fit the bill perfectly, but getting them quick and cleaning up all the flash on boardgame PVC aren’t compatible ideas. Then it hit me: Shadows of Brimstone. Low-detail, simple models that I don’t and won’t ever especially care a lot about that are also in HIPs, which is one of my (and most gamers’) preferred materials to work with. So a trip to the War Room at 11pm at night and I found a few appropriate kits. Stayed up for an hour ot two assembling some of them, and spent a decent chunk of time on Sunday and after work Monday getting enough done to hit my minimum 1-per-day each month. Here’s the first pair of them.

As you can see, they’re simple models. Three-part assembly not including the bases. After spray black and drybrush a-go-go, I black washed them, based them and let dry. After that, I lined several areas with thin white, let dry, then made a paint wash with a lime-ish green to give them a bit of a glow effect. The idea is to make them (kinda) visually Necron-compatible, as well as to reference Warpstone. No idea what the rules are or how they’re used in SoB. Apparently they’re from the “Custodians of Targa” pack, but since almost items from the Kickstarter arrived as a giant pile of unlabelled shrink-wrapped baggies (like a Mantic Kickstarter) I’ll worry about their finer details later.

Shadows of Brimstone: Tentacles (Sea Edition)

So here’s a set of models that I’ve wanted to paint for a couple of years. Ever since the Wave 1 of Shadows of Brimstone arrived on my doorstep, including the extra “red sprues”. The red sprues were a couple of duplicate sprues of the monsters from the core boxes, in red plastic rather then the boxed-set grey as a bonus for Kickstarter backers. I initially wanted to paint them up to represent water-bourne tentacles, so I could use them for Lord of the Rings as The Watcher in the Water or other similar creatures, except… the bloody things have stones all around them. I really couldn’t be bothered sawing them down, and so the project sat idle, every so often I’d remember it, then get annoyed again.

Sometime in the last couple of weeks I had the idea of painting them finally. I still didn’t know how I’d get around the rocks, but I thought “fuck it” and just glued them down to weighted 32mm Citadel bases anyway. The Shadows bases are nicer in some ways, but they won’t take washers quite as well, so I went with the GW ones. I knew I wanted to figure out a way to make them fit as sea bases, but I also didn’t care if they were perfect or not anymore.

Took them outside, spray primed black, then dark green. I still didn’t know exactly what I was going to do, but I knew I wanted sea monster colours, and not purples or red. Once I got them inside again I painted the bases and rocks in a dark sea blue-turquoise (Vallejo Panzer Aces: 309 Periscopes). I then had a thought and dropped some white into my palette with the turquoise and got one of my drybrushes. I then just started dabbing.

Not Like That.

Anyway, it seemed to work, so I added more white, and so on until I had an actually decent-looking mottled pattern that looked like churned water. Next up I played around with a wash of sea green on the tentacles, and then drybrushed the sucker-sides and the back-sides in slightly different shades of green, then a wash/glaze of a mix of P3 Turquioise Ink, Coellia Greenshade and some Liquitex Gloss Medium to thin it down and hold it all together. After drying, a nice hard coat of gloss spray varnish, and then I decided to take a gamble and use a sculpting tool to dab on (yep, again) a bunch of Vallejo Water Effects. Which naturally took 2 days to cure to the point of these photos. I’m not super excited about the yellowing. I’ll see how they look in a week or so, then I’ll decide whether to leave them or try drybrushing a little white on the tips.