

Wow. It’s really been almost seven years since I painted my T-34 tank platoon for Bolt Action, and… nothing since. Damn, time is flying by and unfortunately not in a way that there’s no end in sight! Anyway, the point of this post is not to dwell on the depressing impending end of individual existence – it’s to celebrate the fact that Dave Stone’s Season of Scenery Challenge has finally motivated me to complete this trio of tanks that I bought during Warlord Games’ Valentine’s Day sale.
In 2016.
Don’t worry! I bought a ton of other stuff at the same time, none of which has been opened, let alone painted. Yay me!

The main reason these three took so long to be completed is actually because of the unit markings – I really wanted to get them “right”, which required more very specific knowledge than I have, or have been able to glean from the internet. In the end, it was indeed this month’s painting challenge that motivated me to just say “Screw it!” and get them painted in a “good enough for wargames” manner, so while the specific markings may equate to nonsense in specific terms, they look the part to the layperson like myself. I mean, it’s not like multimillion-dollar movies worry all that much about this sort of thing, so I think I just need to get over it in these terms and skip the analysis paralysis in future.

Originally, I wanted to go with the plain, “sandstone” colour on these, as depicted in the box art, since I think it looks bloody nice. However, the model does not come with decals for some reason. So that required sourcing some third-party ones from both Warlord and Rubicon, though with the unit marking issue noted above, they all sat in boxes while the tanks sat in a tub, all spray basecoated. Even so, the decals I had weren’t enough to use to fully mark a trio of tanks, and so the unit circles on them came from a Space Marine decal sheet (which is why they’re so thin) with the numbers freehanded in. Not the greatest, and it does annoy me still, but I guess they’re passable.
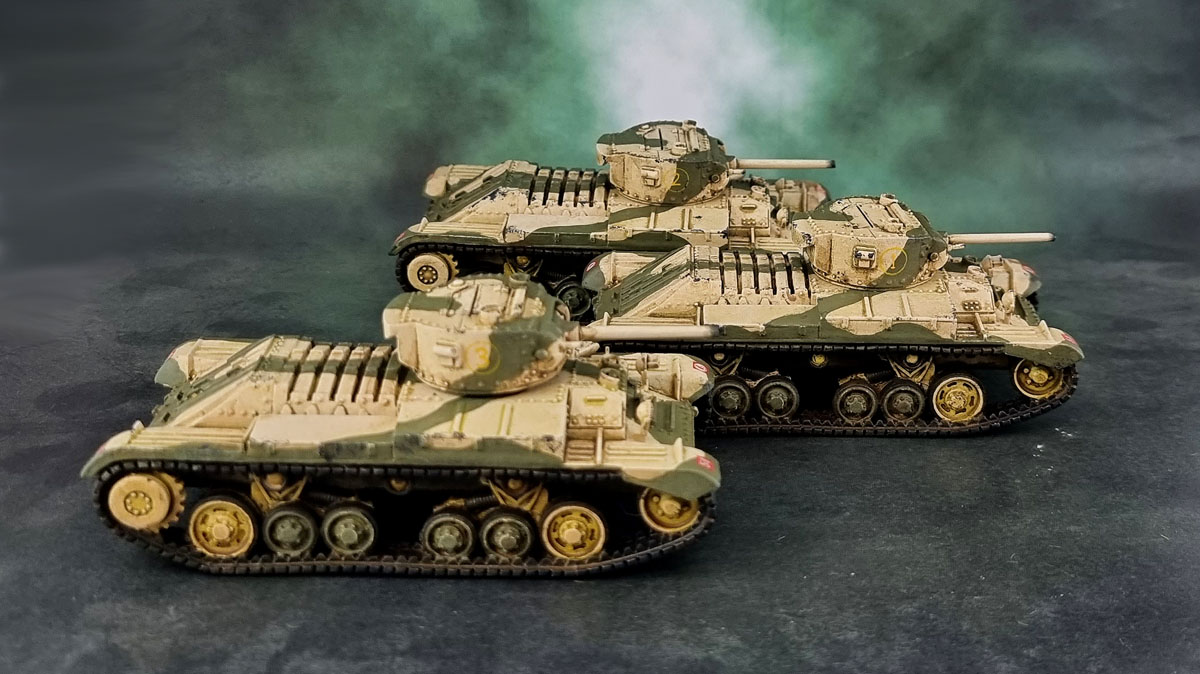
So in the end when I set to paint and finish these three – and in the interests of gameplay – I decided to go with the camo scheme in the end because I figure these models will mostly end up playing in games where I supply both sides – which means the main OpFor will tend to be DAK (Deutsches Afrikakorps, or Afrika Korps) – and those tanks will also be in a plain desert yellow/dunkelgelb. So to keep things more easily identifiable for anyone who might play – and might not know the difference betyween a PZIII and Valentine by sight (the heathens!) I went with the camo scheme for the British armour.
I’m not entirely happy with the finish on the desert yellow on these. It looks a little flat to me, so I may go back and “dab” some patchy lighter yellow on the panels to make it a bit less flat and uniform.

If they were British aircraft, I could have probably turned up info and pictures for you by going through my father’s military books. I like tanks though, and they look good to me! No decals with the models – very disappointing.
LikeLiked by 4 people
Thanks mate! Oddly it seems that armoured vehicles are harder to pin down in terms of the markings than aircraft for some reason, but I appreciate the thought. No decals is certainly pretty shitty considering they make decals for these things. I’ve got a few more resin Warlord armoured vehicles to assemble and paint, but probably won’t be doing any more after I get the ones I have assembled and painted.
LikeLike
Excellent work mate, they look great. I’m choosing to use the story behind them as inspiration to also get some of the stagnant things out of my lead pile, rather than a depressing reflection of all our Wargamers’ tendency to have greater ambition than ability. 😉 I also think going for generic markings is perfectly acceptable for wargaming models, in fact it’s perhaps preferable because if they are too specific then you run into the issue of them only being appropriate for the one specific scenario that you had them in mind for when you painted them in the first place.
LikeLiked by 3 people
Thanks Warburton. I’ve used the extension of these as an impetus to get a fair few other models done in the last couple of weeks. The process has been anything but fun, but I do have to admit there’s a lot of satisfaction in seeing them get finished, and I’m sure there’ll be even more in a couple of days when I possibly may actually “finish” a long-time/abandoned project!
LikeLiked by 1 person
Brilliant! Gotta love the Valentine, it’s a solid looking tank. You did sterling work on them!
LikeLiked by 3 people
Thanks mate! I appreciate the kind words. 🙂
LikeLike
Looks good to me dude – ‘close enough for government work’ 😊
LikeLiked by 3 people
Thanks Alex. I doubt they’ll encounter too many rivet counters in person, so thankfully I think they’lll be safe. 🙂
LikeLiked by 1 person
They look good to me, and I’m assuming this is a nice change of pace from all the board game miniatures!
LikeLiked by 4 people
Cheers Dave! Well, they were certainly something different ot what I’ve typically been working on for awhile! 🙂
LikeLiked by 1 person
Excellent work on all 3 mate, the camo pattern is varied enough to make them look unique but tied together from the same force. Having only a vague knowledge of that time period I wouldn’t know that those weren’t the markings, I’ll wait for John and Mark’s comments, as they are the history buff’s
LikeLiked by 5 people
Thanks Dave. I have no idea how camo patterns were decided on or applied to 8th army tanks, but most models I see of tank squardons of them seem to have them all with similar camo, so I went with assuming a broad directive to get the camo on in a specific way but then applied by hand at different times by different individuals – possibly in the field. 🙂
LikeLiked by 2 people
Well, I could go upstairs and dig out my books on British tank markings and camouflage, but what for? They would not tell me that these look really good and I really like ’em! 🙂 The two-tone camouflage definitely makes them look much better. I can remember that British tanks carry different coloured geometric symbols containing numbers, but on those rare occasions I have to paint them I always have to look everything up. I’ve had to hand paint the symbols and numbers before, so well done with them!
LikeLiked by 6 people
Thanks John! I believe the markings all make individual sense and are applied in the right locations, just that the combination I have here doesn’t actually align to any specific unit or place, so once I got over that, it wasn’t too bad in the end. I did get them out this afternoon and dab on a bit more variation in the sand yellow sections. Not so much that yoou’d notice it’s been done, but enough to stop them looking so unconsiously flat. Much happier with them now!
LikeLiked by 2 people
First of all, the paint jobs are very effective. Really nice Az. When I was going all-in on my Brit tanks (and Commonwealth too for that matter), I found myself a bit frustrated on the markings front – and my stuff is only 15mm. The truth is that, especially during the North African campaign, that Allied unit markings, equipment carried, and even camouflage patterns changed all the time. As long as you were able to prevent shooting your buddy, all was good. I looked up so many different markings until I realized that the chance that ANYONE would EVER know if my stuff was mistakenly marked was effectively zero. So, have fun and paint more!
LikeLiked by 4 people
Thanks Mark. That’s very true – my 15mm DAK army is a rag-tag mix of uniform colours to represent new gear, old gear, faded gear and LOTS of scavenged British and Commonwealth gear. 🙂
LikeLiked by 4 people
I’m very much an ignorant heathen when it comes to tanks but these look good to me. 🙂
LikeLiked by 3 people
TANKS for the kind compliment, Wudu! 😀
Oh, I crack myself up sometimes…..
LikeLiked by 3 people
I went with the plain sand colour on both my DAK and Rats 20mm tanks, just made it a little darker on the DAK ones.
These look good though to me.
Cheers Roger.
LikeLiked by 4 people
Thanks Roger – makes sense, though for myself I’m sticking with the German armour being based on Vallejo’s “Desert Yellow” while my upcoming Brits more of a pale sandstone/bone colour, though with camo added in order to make them more easily distinguishable from one another at a glance by people with no specific knowledge beyond “tank”.
LikeLiked by 1 person
Really nice job on these, the camo looks excellent!
LikeLiked by 4 people
Thanks Matt – hopefully I’ll be able to show some decent improvment on Brotish armour over time as well! 🙂
LikeLiked by 1 person
They look great- I don’t think they are too flat in terms of finish.
Cheers,
Pete.
LikeLiked by 4 people
Thanks Pete – I did go back and stipple some variation to the pale sand base and now I’m a fair bit happier with it.
LikeLiked by 1 person
I’m with Wudugast, I know nothing about their camo, insignia, and whatnot. What I do know is that these look great and don’t be too hard on yourself for letting them sit for a while. Inspiration can be like lightning in a bottle. It comes and goes before you’re ready sometimes.
LikeLiked by 4 people
Thanks Kuribo! I’m certainly hopeful that I can keep my current interest in armour that was triggered by all of this going along for awhile yet!
LikeLiked by 1 person
Pingback: Battlefront Miniatures 15mm Panther Gs, Jagdpanthers and Stug IIIGs (Flames of War) | Azazel's Bitz Box.
Brilliant work mate! as for markings ,like Mark said as long as who new who it didn’t matter! My who was in WWII Artillery said if you had time to paint your markings back in there original place you were not anywhere near the front!!
LikeLiked by 1 person
Pingback: Battlefront 15mm M4A1 Sherman Armoured Squadron – British 8th Army Desert Rats for Flames of War | Azazel's Bitz Box.